

Silicone Mold Cost: 10 Proven Ways to Reduce It
A silicone mold cost is quoted as a single number, but it is built from five blocks: steel, machining hours, polishing, sampling and engineering. Only two of them scale with part complexity — which is why the cheapest-looking quote is rarely the cheapest project.
There are two ways to lower it. The slow way is negotiating the total price, which typically moves 5–8%. The fast way is changing the design before the first cut, which typically moves 20–35% and does not touch part quality.
This guide covers both: what drives silicone mold cost, the ten decisions that reduce it, and the four places where cutting cost quietly creates a more expensive part.
What Actually Drives Silicone Mold Cost
Before asking how to make a mold cheaper, separate the quote into its blocks. In a typical compression or LSR tool, the split looks like this:
| Cost block | Typical share of quote | What moves it |
|---|---|---|
| Mold base and cavity steel | 25–35% | Steel grade, mold size, plate thickness |
| CNC and EDM machining hours | 30–40% | Cavity count, undercuts, tolerance, surface spec |
| Polishing and surface finish | 10–20% | SPI grade, deep cavities, cosmetic surfaces |
| Sampling and rework | 5–10% | How many design changes arrive after T1 |
| DFM, programming, inspection | 3–5% | Whether the drawing was reviewed before cutting |
The largest single variable is not the steel. It is the number of changes made after the first sample. A feature moved in CAD costs nothing. The same feature moved after T1 means re-machining, re-polishing and a new sampling round — and that is where quotes double.
1. Run a DFM Review Before Tooling
Design for Manufacturing is the highest-leverage step, and it is where most of the silicone mold cost is actually decided — before any money is committed.
The checks that matter most for silicone:
- Wall thickness — keep adjacent walls balanced. A sudden thick section extends cure time and warps.
- Draft angle — 1–2° on vertical walls, 3° or more on textured surfaces.
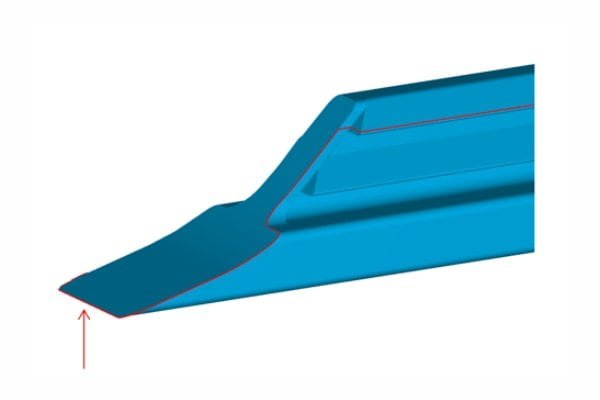
- Undercuts — silicone stretches over small bumps, so shallow undercuts can often be designed out entirely. Deep ones need sliders, and sliders are where mold cost jumps.
- Parting line — place it on a non-visible edge. It reduces both flash and trimming labor downstream.
- Radii — fillet internal corners. Sharp internal corners are tear points and they wear the tool.
- Shrinkage — build 2–4% compensation into the cavity dimensions rather than correcting it at trial.
A good review often removes side actions and simplifies ejection, which cuts both machining hours and polishing time. Our 10-point DFM checklist walks through the full sequence.
2. Choose Mold Material by Volume, Not by Habit
"Steel is better" is the most expensive default in silicone tooling. Material is the second-biggest lever on silicone mold cost after geometry: for low volume, aluminum is cheaper, faster and accurate enough.
| Factor | Aluminum mold | Steel mold |
|---|---|---|
| Upfront cost | 30–50% lower | Baseline |
| Lead time | 2–4 weeks | 4–8 weeks |
| Tool life | ~5,000–50,000 shots | 500,000–1,000,000+ shots |
| Best for | Prototypes, bridge runs, under 10,000 parts | Stable high-volume production |
| Surface finish | Matte and texture reliable; mirror limited | Full range |
| Dimensional stability | Good for short runs | Better over long runs |
The decision rule we apply:
- Under ~10,000 parts → aluminum bridge tool
- 10,000–30,000 parts → depends on tolerance and cosmetic class
- Above ~50,000 parts → hardened steel usually wins on cost per part
The crossover is set by shots, not by preference. An aluminum tool that wears out at 20,000 shots on a 60,000-part program is not cheaper — it is a second tool you did not budget for.
3. Right-Size the Cavity Count
More cavities lower the cost per part but raise the tool cost, and the curve is not linear. Cavity count is also the line most often misjudged in a silicone mold cost estimate.
- Single cavity — lowest tool cost, best for prototypes and large parts
- 2–4 cavities — the practical balance for medium volume
- 8+ cavities — only justified at high annual volume with a frozen design
Multi-cavity tooling costs more because of the larger base, balanced runner design, cooling layout and tighter machining tolerance. If annual demand is uncertain, a 4-cavity tool usually pays back faster than an 8-cavity one, and a single-cavity prototype first is the safest route.
The calculation that settles the argument:
Cost per part = (tooling amortization + machine time + labor + scrap) ÷ good parts produced
Run it for both cavity counts at your real annual volume, not at the volume you hope for.
4. Match the Process to the Volume
LSR injection and HTV compression have different cost structures, and choosing the wrong one inflates both tooling and piece price.
- LSR-Einspritzung — better for complex geometry, thin walls, tight tolerance and automation. Higher tool cost, faster cycle, less material waste at scale.
- HTV / compression — lower tool cost for simpler parts, heavier sections and lower volume. Often no runner system at all.
For a few thousand parts, a compression tool or a low-cavity LSR mold is usually cheaper than a fully automated LSR cell. The comparison in detail is in our guide to LSR injection molding vs HTV.
5. Cut Surface Finish Where Nobody Looks
Surface finish is 10–20% of silicone mold cost and one of the few line items you can remove without touching function.
- Matte or sandblast — cheapest, fastest to machine
- Light texture or etching — moderate
- High polish or mirror — adds polishing hours, especially in deep cavities
- Combined finishes — polish only the sealing faces and leave the rest matte
If the part is not consumer-facing, default to matte. Reserve mirror polish for optical zones and sealing surfaces. The trade-offs are covered in our breakdown of silicone mold surface finish.
One caution: polish on a sealing face is not cosmetic. Removing it there to save money shows up later as a leak.
6. Choose the Runner System for the Run Length
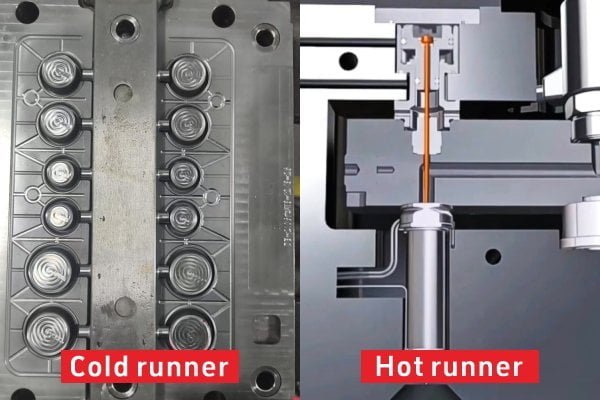
- Cold runner — lower tool cost, some sprue waste, right for prototypes and short runs
- Hot runner / valve gate — higher tool cost, near-zero waste, cleaner gate vestige
- Sub-gate — a reasonable compromise on non-cosmetic surfaces
Under roughly 10,000–20,000 parts, a cold runner is usually enough. On long LSR programs, hot runner payback comes through material savings and cycle time rather than through the tooling quote — so compare total cost, not tool price.
7. Prototype in Aluminum Before Production Steel
Prototype tooling looks like added silicone mold cost. It is actually the cheapest insurance in the project.
A staged path looks like this: RTV or 3D-printed mold for concept fit, aluminum single-cavity tool for functional samples, MUD insert for variants, and steel only after design freeze.
Late changes to a hardened steel mold mean welding, re-CNC, re-polishing and a new sampling round. Validating fit, hardness, sealing and wall thickness early costs a fraction of that.
8. Stop Over-Specifying Tolerances
Tolerance is the most common hidden silicone mold cost, because a tight tolerance is only expensive when it is not needed. For every CTQ dimension, ask three questions:
- Does it affect sealing, assembly or function?
- Can the mold control it instead of post-machining?
- Is ±0.1 mm enough where the drawing says ±0.03 mm?
The same logic applies to Shore hardness tolerance, color tolerance, cosmetic class and test certificates. Paying for documentation your market does not require is a common line item in Chinese tooling quotes that buyers never challenge.
9. Buy Process Control, Not the Lowest Quote
The lowest quote usually hides silicone mold cost in scrap, misbuilds and repeated sampling. Quality system cost is real, but so is the cost of poor quality.
ISO 9001 covers process control, corrective action and supplier control — the mechanics that keep a mold build on schedule. For medical programs, ISO 13485 adds design control and traceability that most Western buyers now require at the quoting stage.
A practical way to price that difference: take the supplier's scrap rate and multiply it by your annual volume. A 3% scrap rate on 100,000 parts usually costs more than the spread between the two quotes.
10. Pre-Quote Checklist
Send this with your RFQ. It shortens the quote cycle and removes the most common cost drivers before they are priced in.
- Finalize function and assembly before tooling starts
- Remove non-functional undercuts
- Apply tight tolerances only at CTQ features
- Keep wall thickness uniform
- Place the parting line on a hidden surface
- Choose aluminum below 10,000 parts
- Choose hardened steel above 50,000 parts
- Set cavity count from annual demand, not from unit price
- Default to matte unless a cosmetic surface is required
- Validate with a prototype tool first
- Ask the molder for DFM feedback before approving the quote
What Not to Cut
Four savings look attractive and cost more later:
Sampling rounds. Skipping T2 to save two weeks usually produces a batch that fails incoming inspection.
Steel grade at high volume. An aluminum tool on a 500,000-part program fails mid-run, and the replacement tool plus the line stop exceeds the original saving.
Polish on sealing surfaces. It is a functional requirement, not a cosmetic one.
DFM time. This is the one line item where spending more reliably reduces the total.
Frequently Asked Questions
Does a cheaper mold make more expensive parts?
Often, yes. Tooling is amortized across the program, while scrap, slower cycles and rework are paid on every part. A tool that costs 30% less but adds 3% scrap to a 100,000-part run usually loses on total cost.
Is an aluminum mold good enough for production?
For runs under roughly 10,000 parts, yes — including bridge production and market testing. Above that, wear on the cavity and the parting line starts to affect flash and edge quality, and the tool may need replacing mid-program.
How many cavities should I specify?
Start from annual demand, then check the payback. Single cavity for prototypes and large parts, 2–4 for medium volume, 8 or more only with a frozen design and confirmed annual volume. Compare cost per part, not tool price.
What is the fastest way to reduce silicone mold cost?
Change the design, not the supplier. Removing an undercut or relaxing an unnecessary tolerance before the first cut typically saves more than any negotiation after the quote is issued.
Can I reuse an existing mold?
If the geometry, material and volume still match, yes — and it is the single largest saving available. Check cavity condition and parting line wear before committing, because a worn tool produces flash that costs more to trim than a new tool costs to build. Our guide to silicone rough edges explains what to inspect.
Schlussfolgerung
Reducing silicone mold cost is not about buying the cheapest block of steel. It is about matching design complexity, material, cavity count and process to the volume you can actually forecast.
The savings almost always sit before the first cut: simplify the geometry, right-size the tolerances, use aluminum for prototypes, avoid over-cavitation, and validate with samples before committing to production steel.
At Dibo Technology, we review drawings during quotation, propose DFM changes and recommend an aluminum bridge tool or a steel production mold based on projected volume — not on what carries the higher margin. If you want a second opinion on a quote, send us the drawing and the volume and we will return a DFM review with the cost drivers marked.
About the Author & Dibo Tech
My name is Kunfa Ye, but friends call me Jeff. I was born in 1986, the year of the Tiger. In 2011, my brother Autumn Ye and I co-founded Dibo Tech, rooting ourselves in the silicone rubber industry for fifteen years. Building from scratch, we navigated industry cycles and learned the true rewards of hard work. We have always built our business on technical expertise and integrity.
The silicone industry touches every corner of modern manufacturing. I deeply believe that behind every product lies trust, and the essence of business is mutual gain. Over these years, my proudest achievement is not personal financial independence, but helping our clients optimize supply chains and boost production efficiency. Their success is far more rewarding than personal milestones. Today, I aim to give back by sharing insights, answering engineering questions, and connecting resources.
Brand Name: Dibo Tech Slogan: Dibo Technology Silicone Manufacturing Specialists Website: https://samxine.com/ Our Mission: Based on strong technical capabilities and quality first, we are committed to innovative and eco-friendly silicone rubber production, providing reliable silicone solutions while fulfilling social responsibilities for a sustainable future.
Schreibe einen Kommentar