

Silicone Mold Surface Finish: 3 Types and How to Choose
A silicone mold surface finish is not a cosmetic decision. It is the texture of the steel, and every part produced from that tool will copy it for the life of the program. Specify it after the first samples fail and you pay twice — once to re-polish or re-etch the cavity, and again for the weeks lost.
There are only three families of silicone mold surface finish: matte, mirror and textured. The choice is driven by four questions — how the part is seen, how it is gripped, how it releases from the cavity, and how it has to be cleaned.
This guide covers all three, the SPI grades buyers keep getting quoted, what each one adds to tooling cost, and how to write the requirement on a drawing so it survives the trip to the mold shop.
What a Silicone Mold Surface Finish Actually Controls
Silicone replicates the cavity at a level that surprises most buyers. There is no paint layer and no post-mold coating to hide tool marks — whatever is on the steel is on the part.
That single fact drives five outcomes:
- Appearance — gloss level, grain and how visible fingerprints are
- Feel — smooth, soft-touch, grippy, or slick
- Demolding — polished cavities release more easily; textures increase friction
- Defect visibility — matte hides flow lines and minor scratches; mirror exposes every one
- Cleanability — a smoother surface is easier to wipe down, which is why medical and food parts trend toward fine polish
A wrong finish does not usually produce a scrap part. It produces a part that passes inspection and fails in the customer's hand — too glossy for a grip surface, too rough for a sealing face, or impossible to clean in a hospital.
The Three Finishes Side by Side
| Finish | SPI range | Gloss | Tooling cost | Draft needed | Best for |
|---|---|---|---|---|---|
| Matte (blasted) | C-1 to D-2 | Low, diffuse | Baseline | 1–2° | Cases, gaskets, mats, keypads |
| Mirror (polished) | A-1 to A-3 | High, reflective | +15–30% | 1° or less | Clear LSR, medical, cosmetic |
| Textured (etched) | Custom / VDI | Patterned | +10–25% | 2–3° and up | Branding, grip, hides defects |
Those cost figures are tooling impact, not part price. Mirror polish adds hours of hand work per cavity; deep texture adds etching and re-etching after every repair.

1. Matte Finish (Blasted or Frosted)
Matte is the default silicone mold surface finish for most parts, and usually the right default.
After CNC machining and spot-drilling, the cavity is blasted with glass bead or oxide media. This removes milling marks, breaks the directional tool pattern, and leaves a diffuse surface that scatters light instead of reflecting it.
What it buys you: fingerprints and dust disappear, minor flow lines are hidden, grip improves on dry surfaces, and tooling cost stays low.
Where it fails: matte hides defects from the customer and from your own inspectors. A flow line or a weld mark that would be obvious on a mirror part can slide through final inspection on a matte one. Matte also tends to be the finish most often applied "by feel" rather than by grit size — two suppliers quoting "matte" may deliver visibly different surfaces.
Specify the blast media and grit, not just the word matte.

2. Mirror Finish (High Gloss, SPI A)
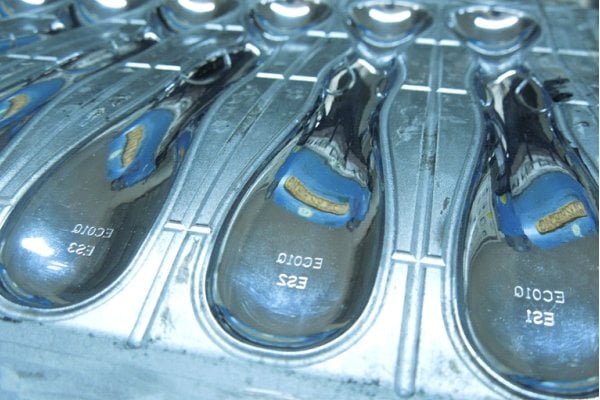
Mirror is the most expensive silicone mold surface finish, and it is used when the part must look transparent, look premium, or be easy to clean. The cavity is worked down with diamond compound, stones or paper, then finished with ultrasonic or hand polishing until it reflects like glass.
The grades matter more here than anywhere else:
- A-1 — optical and high-clarity LSR, the most demanding
- A-2 — medical tubing, baby bottle nipples, parts that must wipe clean
- A-3 — cosmetic gloss for consumer products
Trade-offs, honestly stated. A mirror cavity shows every scratch, every vent mark and every parting-line mismatch. It costs more to build, more to maintain, and more to repair — a damaged polish means re-polishing the whole cavity, not touching up a spot. And it demands discipline in handling: a mirror tool left uncovered on a bench overnight can pick up damage that shows on the next hundred parts.
For medical LSR programs the polish is functional, not decorative: a fine finish is part of cleanability and of the process validation audited under ISO 13485. The material side is covered in our guide to medical-grade liquid silicone rubber.
3. Textured Finish (Etching, Laser, EDM)
Textured finishes are the most misunderstood silicone mold surface finish: they put a pattern into the steel, and the pattern becomes the part.
- Chemical etching — leather grain, pebble, custom patterns applied through a mask
- Laser engraving — fine logos, text and micro-grain
- EDM texture — functional matte grain, often specified by VDI reference
What it buys you: brand differentiation without printing, grip on wet or oily surfaces, and the best defect hiding of the three finishes.
The catch with any textured silicone mold surface finish is draft. Texture increases contact area during ejection, and contact area is friction. A cavity that releases cleanly at 1° will drag with a deep grain.
| Texture depth | Typical draft per side |
|---|---|
| Light laser grain (under 0.05 mm) | 1.5–2° |
| Medium etch (0.05–0.15 mm) | 2–3° |
| Deep or coarse grain (0.15 mm+) | 3–5° |
These are starting points, not rules. Part geometry, wall thickness, hardness and release method all move them. Confirm draft before the texture goes into the cavity, because adding draft afterwards means re-machining the cavity and re-etching the texture.

SPI Grades Without the Confusion
Reading a silicone mold surface finish quote usually means decoding SPI codes. The scale was written for plastics injection molds, and silicone shops borrow it. Two suppliers quoting "SPI B-2" may still interpret it differently, so treat the grade as a starting point and ask for a sample plaque.
| SPI grade | Typical Ra | Surface character |
|---|---|---|
| A-1 | 0.012–0.025 µm | Optical mirror |
| A-2 | 0.025–0.05 µm | High gloss |
| A-3 | 0.05–0.1 µm | Gloss |
| B-1 / B-2 | 0.1–0.3 µm | Semi-gloss |
| C-1 / C-2 | 0.3–0.8 µm | Fine matte |
| D-1 / D-2 | 0.8–2.0 µm | Blasted texture |
Ra values vary by shop and by measuring method. What matters commercially: the step from A-3 to A-2 roughly doubles polishing time per cavity, and the step from C to D changes the draft requirement, not just the look.
How Silicone Mold Surface Finish Drives Cost
Silicone mold surface finish is one of the few line items whose cost is visible before you commit.
- Matte, blasted — baseline. Fast to apply, easy to restore after repair.
- Mirror, A-2 — adds roughly 15–30% to cavity cost and needs maintenance discipline.
- Deep texture — adds 10–25%, plus re-etching cost every time the cavity is repaired.
- Mixed finish (polish on a sealing face, matte elsewhere) — cheaper than full mirror, and usually the smartest specification for functional parts.
The mistake is treating mirror as "better". On a part nobody sees, mirror polish is money spent on a surface that will be hidden by the assembly — and it makes every handling scratch visible during production. The full cost structure of a tool is broken down in our guide to silicone mold cost.
Five Specifications That Cause Rejects
1. "Polished" with no grade. The supplier delivers A-3, you expected A-1, and both are technically "polished". Name the grade and the Ra.
2. Texture with no extra draft. The tool is textured, the part drags, and the fix is a new cavity. Draft is decided before texturing, never after.
3. Mirror on a grip surface. Gloss on a wet hand is a safety and usability problem. Grip parts want texture, not polish.
4. Mixed finish on mating surfaces. If one sealing face is polished and its partner is blasted, the seal loads unevenly and leaks under pressure.
5. Finish specified after T1. Changing finish after the first samples means re-polishing or re-etching every cavity, then a new sampling round. It is the single most expensive way to change a surface.
How to Specify Silicone Mold Surface Finish on a Drawing
A silicone mold surface finish that lives only in an email will be reinterpreted at the tool shop. One line on the drawing prevents most of these problems. Write it per surface zone, not for the part as a whole:
Cavity surfaces: SPI A-2 on sealing face and optical window; SPI C-1 matte on all other surfaces. No polishing on textured zones. Provide surface plaque for approval before production.
Four rules that make the note work:
- Keep material and finish separate. The compound callout (ASTM D2000) and the surface specification are two different requirements. When they are merged into one note, the finish is the part that gets dropped.
- Assign zones. Most parts need two finishes, not one.
- Request a plaque. A physical sample settles arguments that a specification cannot.
- State the draft that goes with any texture, so the tool designer cannot separate the two decisions.
If you are ordering compression tooling, review flash land and venting at the same time — finish alone will not correct a rough parting line. That is the root cause covered in our guide to silicone rough edges, and the tooling side is covered in companies that make silicone molds.
Finish vs Post-Mold Decoration
Buyers sometimes treat these as interchangeable. They are not.
| Tooling finish | Post-mold decoration | |
|---|---|---|
| Applied | Into the cavity, before molding | After molding |
| Durability | Life of the tool | Can wear, peel or fade |
| Cost | One-time tooling | Per part |
| Medical / food | No added material | Coating may need validation |
| Examples | Blast, polish, etch | Spray, pad print, laser mark |
A mold finish is permanent and applies to every shot. Post-mold decoration buys flexibility at the cost of per-part expense and, in regulated markets, additional validation. Neither is inherently better — but they cannot substitute for each other.
Frequently Asked Questions
Which is better for silicone parts, matte or mirror finish?
Neither, in the abstract. Matte hides fingerprints and minor defects and costs less; mirror gives gloss, clarity and easier cleaning. Choose from the part's function: sealing faces and optical windows want fine polish, grip surfaces want texture or matte.
Can silicone mold surface finish be changed after the mold is made?
Yes, but not cheaply. Moving matte to mirror means re-polishing every cavity. Moving mirror to texture means etching, which also changes the draft requirement. Moving texture back to mirror requires removing the pattern entirely — usually a new insert, not a repair.
Does textured mold finish require more draft angle?
Yes. Texture adds friction during ejection, so a cavity that releases at 1° may drag at 0.1 mm grain depth. Light laser grain typically needs 1.5–2° per side, medium etch 2–3°, and coarse grain 3–5°.
What does mirror polish add to silicone mold cost?
Roughly 15–30% on cavity cost, depending on the grade and the number of cavities, plus ongoing maintenance. On parts that will be hidden in assembly, that money buys nothing the customer will ever see.
How do I know the supplier actually achieved the specified finish?
Ask for a surface plaque from the first article, and compare it to the plaque approved at DFM. Visual comparison under the same light is more reliable than a Ra reading taken on a curved surface.
결론
The right silicone mold surface finish is a tooling decision, not an afterthought. It sets gloss, grip, release, cleanability and how visible every defect will be — and it is far cheaper to decide before the cavity is cut than after the first samples.
Choose matte for cost-effective consumer and industrial parts. Choose mirror where clarity, cleanability or gloss is functional. Choose texture for grip and branding, and budget the draft it demands. Then write all of it on the drawing, zone by zone, with a plaque for approval.
If you are at the stage of specifying finish, draft and parting line, send us the 3D drawing and the cosmetic requirements and we will return a DFM review with the finish recommendation for each surface zone.
About the Author & Dibo Tech
My name is Kunfa Ye, but friends call me Jeff. I was born in 1986, the year of the Tiger. In 2011, my brother Autumn Ye and I co-founded Dibo Tech, rooting ourselves in the silicone rubber industry for fifteen years. Building from scratch, we navigated industry cycles and learned the true rewards of hard work. We have always built our business on technical expertise and integrity.
The silicone industry touches every corner of modern manufacturing. I deeply believe that behind every product lies trust, and the essence of business is mutual gain. Over these years, my proudest achievement is not personal financial independence, but helping our clients optimize supply chains and boost production efficiency. Their success is far more rewarding than personal milestones. Today, I aim to give back by sharing insights, answering engineering questions, and connecting resources.
Brand Name: Dibo Tech Slogan: Dibo Technology Silicone Manufacturing Specialists Website: https://samxine.com/ Our Mission: Based on strong technical capabilities and quality first, we are committed to innovative and eco-friendly silicone rubber production, providing reliable silicone solutions while fulfilling social responsibilities for a sustainable future.
답글 남기기